Here’s the 17 steps our engineers take to ensure your system won’t cost you a cent more due to “extra work” or “forgotten” features because of inexperience and rules of thumb, AND will also ensure money saving energy efficiency – savings of up to 73% in combined construction and operation costs.
Here are the steps we go through to provide a great result for both you and the client:
1. We’ll thoroughly study the building concept plans sent over by you, the architect. We do this to gain a good understanding of the project, and allows us to identify:
- Any elements we need clarification on (A particular concept, construction details, etc.)
- What further documentation we need (detailed drawings, product information)
- Factors in the concept design that may negatively impact on thermal efficiency and comfort, which we can bring up before the design gets too advanced and it’s too difficult to change.
2. We’ve got our bearings and prepared our questions – so it’s now time to meet with you and listen to your ideas, explain your overall concept for the building, and any concerns you may have. We’ll then ask our questions and bring up our concerns (if any) that could affect the comfort and efficiency of the building. The meeting will finish with a clear understanding of what we’re working towards and when it’s required by, so we’re on the same page and can move the project forward.
3. Next, we must talk to the client/investor, and see what their expectations are and what they value. This step is critical – without this it’s pointless moving forward, as we’d just be making assumptions and could end up providing a solution outside of what the client expects. Some clients don’t mind warmer weather, so cooling loads (and hence equipment size and running costs) can be reduced. Some want a simple system, some want the best money can buy. We must understand very well what the client wants, so we know exactly what to deliver.
4. After we’ve collected all the important information, we can put together some ideas on how to climate condition the building according to what we have learned from you and the client. At this stage we fine tune expectations through our further discussions to ensure everyone is on the same page.
5. We’re on the same page now and have a game plan for what we’re going to do, so it’s time to get down to the numbers. We’ll painstakingly calculate the heat load for the building – the peak rates of heating required in winter and cooling required in summer. We do this so we’re 100% sure of which type of technology to employ, and to what extent – and not rely on guess work that’ll leave the client stuck with an inadequate system after construction, or an oversized system due to rules of thumb and excessive safety margins (which is equally as bad). This is an intricate multistage process – see a summary of the steps we take here
Determine the micro-climate of the building location:
- Trees or any natural features that create shading over the proposed building.
- Is the building situated in an area of unique topography (e.g. Valley or a peak).
- Proximity of water bodies.
- The stable shallow ground temperature.
Determine the macro-climate of the area:
- The max/min temperatures during the year.
- Prevailing winds and their influence.
- Sun light angle and intensity during the year.
- Monthly solar irradiance.
- Temperature extremes (days where temperature is under 0˚C or over 40˚C).
Determine the energy transmissivity of the building fabric, and how much energy leakage we can expect into and out of the building.
- Roof composition:
- Surface colour and material.
- Insulation and anti-condensation.
- Ventilation capacity.
- Ceiling insulation.
- Ceiling finish.
- Wall composition:
- External surface finish and colour.
- Composite construction (e.g. Stud frame, rammed earth, double brick, etc.).
- Ventilation and air gaps.
- Insulation (surface clad or within structure).
- Internal finish.
- Floor on grade and suspended floor constructions:
- Underside insulation.
- Material type (concrete, timber) and thickness.
- Floor finish type (marble, timber, carpet, etc.) and thermal resistance.
- Glazing:
- Thicknesses of panes.
- Emissivity of panes.
- Reflectivity of panes.
- Gas barrier between panes.
- Air Infiltration:
- Around glazing frames and joins.
- Under doors and around door frames.
- Wall/roof penetrations that aren’t sealed properly.
- Ventilation and exhaust fans without backdraft dampers.
Consider the influence of appliances influencing internal climate:
- Lighting.
- Computers.
- Other appliances (TVs, fridges, etc.).
- Fireplaces/flues.
This information is considered when we do your detailed heat load calculation. Parts of the data we calculate manually, then all data is aggregated with our software modelling program which does the minute computations. We can also do lighting simulation, detailed thermal simulation and energy costing simulations at this stage if requested.
6. Now we have our first energy result which we analyse and identify areas for improvement (if any). We meet with you to discuss the results, and if improvements are suggested, we work with you to integrate them innovatively with minimal disruption to your design. Ideally, in any size building, we want the heat load to be as close to zero as possible – however, this is most often unrealistic due to aesthetic factors such as glazing.
Changes we might suggest include:
- Solar shading.
- Insulation improvement.
- Ventilation improvement of habitable or enclosed spaces.
- Propose alternate construction materials or finishes.
- Increase, decrease, or decouple thermal mass.
7. This is also the time where we liaise with the other engineering disciplines on the project so we can achieve the client’s requirements – e.g. more or less thermal mass with structural engineer to achieve good internal thermal balance, or electrical/hydraulic requirements for equipment or controls – so that there’s not anything forgotten at construction phase that will cost more or have to be done as an afterthought. It’s always beneficial to start this collaboration off as early as possible.
8. Other building physics issues are generally considered (or uncovered) during this point in the project – issues that will save the client money in the long term, and can give yourself or the client major headaches in the future, such as:
- Condensation formation risks in roof space or cavities – meaning material damage and mould/biological growth.
- Excessive energy consumption due to undesirable elements – such as huge energy sucking concrete beams (which can usually be remedied easily if identified early on).
- Mechanical movement of non-structural elements that can cause hydro-insulation breaks (in concrete roof construction for example).
9. Next we’ll get the revised plans from you again (if changes were required), and we’ll re-run the heat load calculations to give us the latest results reflecting any changes made in the design details. This is our final energy result – unless there are some drastic design changes in the future.
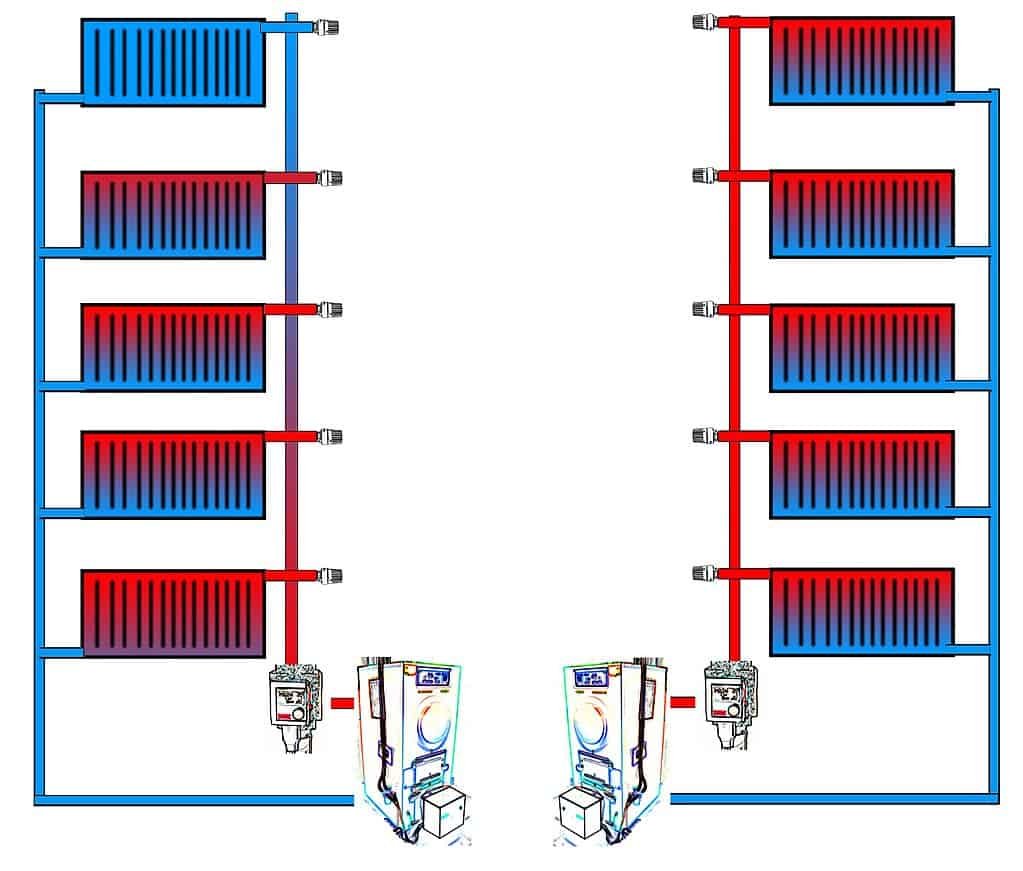
10. Now we can propose the right type of climate conditioning system according to our accurate energy calculations and the desires of the client and you, the architect. We might find at this stage that there’s only a small requirement for heating or cooling – great! This means smaller machinery and lower consumption costs for the client – meaning both capital cost and running cost wins!
11. We’ll send the design proposal to you, and wait for your initial feedback on things such as the general concept of system, down to specific equipment type and positions, method of controls, etc. Much of the work at this stage is working closely with you figuring out how to best hide equipment within the building structure, or mitigating unpleasant potential acoustic, vibration or reject air (e.g. making sure hot/cold reject air is not blowing onto glazing or the neighbouring property, alleviating future issues).
12. This is the best time to meet with the client again – in this sweet spot we’re not too far as to not be able to make changes to the system or the building, but we still have enough good information to work with and make solid decisions on how to move forward. We present to you and the client the climate control system concept and explain how it will work (the technology being employed), what the pros/cons are (e.g. efficiency vs. capital cost), how it will be controlled (balance of automation and user oversight). If the client has interest, we can go over further options to make the system or the building super-energy efficient, such as energy recuperation, long-term energy storage and co/tri-generation.
13. We’ve finalised the concept of the climate control system with you and the client, so now we can put the exact system design into stone. We’ll produce detailed drawings showing every required detail to ensure the system can be constructed precisely, with a comprehensive specification to accompany to allow for accurate system pricing.
14. In addition to the detailed plans and specification, a detailed construction budget can be determined, including pay-back period calculations, allowing an analyses of the project investment and an overview of its sustainability.
15. We’ll send all information off to you first, and give you the general run down. Together we’ll meet with the client to do the overall presentation:
Present the drawings, specification and budget, and go through in detail:
- How the system will operate.
- Performance expectations.
- Comfort expectations.
- How the system will be controlled.
- Value of the system.
16. Clients find that the system presented meets the requirements/expectations set at the beginning of the process and during the various points of communication during the design period, so there are seldom any changes made, and construction drawings and specification can be issued.
17. Our engineers remain involved throughout the construction process, ensuring the standard of work is to the highest quality, that equipment is installed to best practice standards, the system is commissioned accordingly and definitively meets performance expectations. This continual oversight captures any issues or faults in the work or the system at a stage where they can be easily rectified, and won’t cause issues in the future that are problematic to diagnose and fix. Through continual site inspections and communication with the installers, builder, and architect, the client is ensured a system that is flawless in operation and lifespan.