

You Find Out in July
Stop. Before you put the first pipe in.
Drawn from the calls we take every winter. The people are composites, not clients; the figures are our modelled estimates, not their bills.
Several times a month, someone rings us about a hydronic system another company put in. The July calls are the ones I could take with my eyes closed. A house two or three winters old. Floor heating under most of the ground floor, run every day and lukewarm by dinner. A power bill the caller reads out slowly, the way people read out a diagnosis. And somewhere in the first minute, the sentence that tells me the whole story: "The installer says nothing's wrong with it."
The installer is usually right. Nothing is wrong with the installation. The pipe is where the drawings put it and it holds pressure. The heat pump runs. The thermostat is on the wall. Every physical step was done, and done to the quote. What is missing never appeared on the quote at all – and by the time the caller works that out, it is under a hundred millimetres of concrete. By then, the architect, the builder and the installer have usually stood in the same room at least once, pointing at each other, trying to work out what went wrong and whose fault it is.
Here is the part that makes those calls painful. Once a floor heating system is in, it is very hard, and usually impossible, to fix. The "repair" would mean ripping up the concrete slab, pulling down walls, basically building the house again. So that is not what people do. They do something quieter and more expensive.
They paid tens of thousands of dollars for a system that never worked, so they switch it off, go back to the aircon or gas heating they were trying to escape, and spend the next ten years telling anyone who will listen that hydronic heating is a money pit. The real cost of getting it wrong is not a repair bill. It is a written-off five-figure asset and a permanent bad taste, from someone who would have loved the technology if it had been engineered properly.
That is the whole reason this guide exists.
Because hydronic floor heating is worth the hype. Done right, it lowers your running costs, runs itself, and gives the whole house an even, comfortable warmth no matter what the weather is doing outside. Done right. That is the entire catch, and almost nobody tells you about it.
The difference between a system you never notice running and a system you switch off in disgust comes down to things you cannot see once the slab is poured. Insulation. Sizing. Where the heat pump sits. How the controls are tuned. The calculations behind all of it. Two systems with the same pipes, laid by two different people, can behave completely differently. The pipe is the cheap, visible 10%. The engineering is the invisible 90% that decides whether it works.
We have been designing and building these systems for homes and commercial buildings across Western Australia since 1992 – more than 30 years and over 23,957 m² of hydronic floor designed and built. Everything below is a snippet of what we have had to learn over that time to make a system run, and run cheaply.
Whether you build with us or not, I want you to get this right. Because once it is in, there is virtually no way to undo a mistake made at the start.
Putting the pipes in a suspended slab
Drawn from the calls we take every winter. The people are composites, not clients; the figures are our modelled estimates, not their bills.
The first Tuesday in June, the forecast said 4 degrees overnight, and Matt did the thing he had waited two years of building to do: he turned the floor heating on before dinner.
By ten that night the tiles were still cold. He put his hand flat on the floor, the way you check a child's forehead. Something, maybe. He left it running.
By Thursday the floor was lukewarm in the middle of the rooms, cold along the edges, and the living room had stopped at 17 degrees. The heat pump had not stopped since Tuesday.
The installer came back the following week. Decent bloke – he had done exactly what his quote said, and his quote had been the cheapest of three. "We've installed heaps of these into suspended slabs," he had told them at the start, and that was true as well. Now he stood in the kitchen and said: "It just needs to soak in. These slabs take a while." He was right about that, at least.
It was Claire who found where the heat was going. She went down to the garage, under the main living room, for the vacuum cleaner – and stopped in the doorway. Warm. Not vaguely warm: warmer than the hallway upstairs. The warmest room in the house was the garage, and the second warmest was the alfresco slab, where the winter rain was drying off the pavers in a neat rectangle that matched the lounge above.
July's heating alone came to about $440. Claire read the bill twice and put it face-down on the bench. They ran the system on weekends for the rest of that winter, then mornings only, and some time in August the switch stayed off. The aircon went back on – the one they had built the house to get away from. At dinner parties the floor heating still comes up occasionally. As a warning.
We take a version of this call every winter. Here is what was happening under that floor – and what it costs, in numbers.
Hydronic floor heating works by circulating warm water through pipes in the floor. The concrete soaks up the heat from the water, and once the floor is warmer than the air around it, it starts releasing that heat into the room.
The fact almost everyone gets wrong: heat does not travel only upward into the room above. Inside concrete, heat spreads in every direction equally.
So:
- The more concrete (or any other mass), the more energy it takes to heat it up.
- The greater the mass, the longer it takes to get warm.
- Bigger mass means bigger surface area, which means bigger heat losses.
Put the pipes in a thick suspended slab – Matt's slab – and you get the worst of all three. It costs a fortune to heat. It takes forever to respond. And most of the energy escapes sideways and downward into places nobody lives.
Two terms carry the rest of this guide. A suspended slab is a concrete floor with open air or a room underneath it – an upper floor, or a floor over a garage. An insulated screed is a layer of concrete-like topping, about 50 mm thick, that the pipes are buried in, laid on a layer of insulation over the main slab and under your floor finish. The insulation sends the heat up into the room instead of down into the slab and the ground.
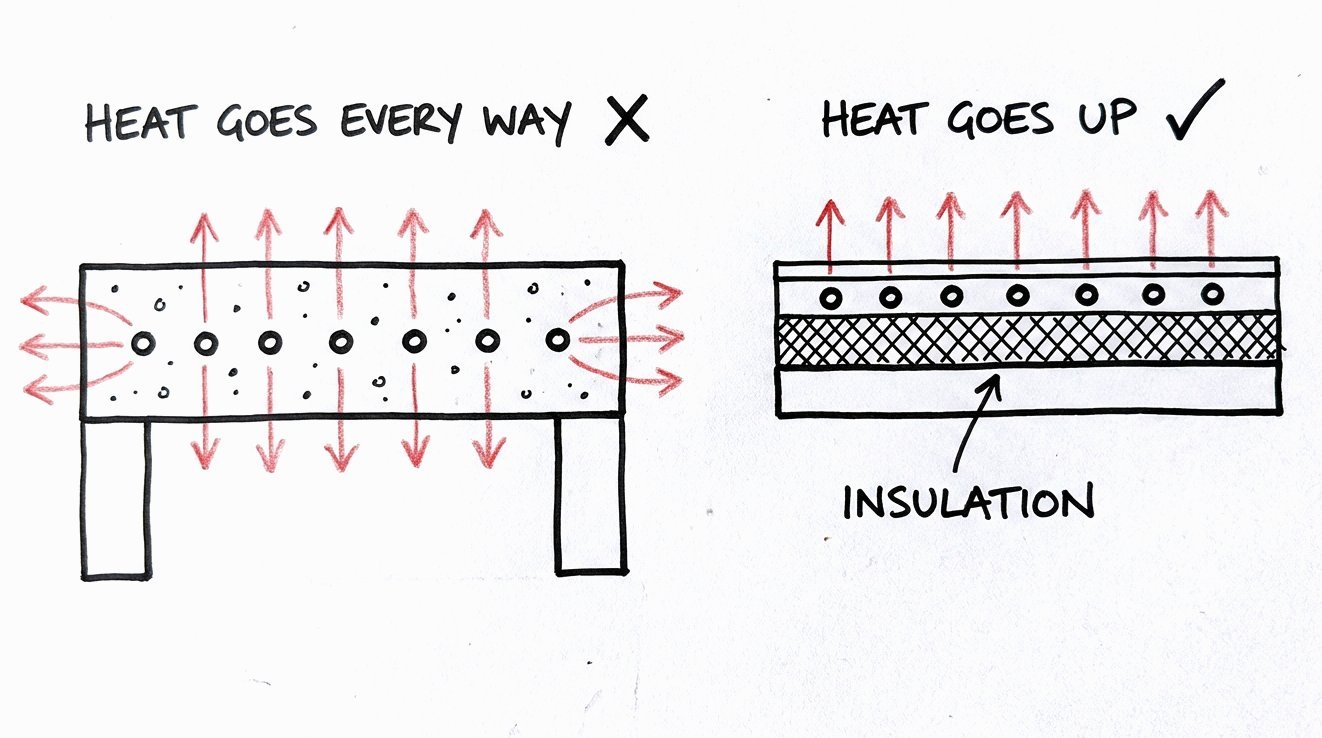
The physics: screed vs suspended slab, on a 100 m² floor
How much more energy does the suspended slab need just to warm up?
Take a 100 m² heated floor. A suspended slab at 0.257 m thick is 25.7 m³ of concrete, about 61.7 tonnes. An insulated screed at 0.05 m thick is 5.0 m³, about 12.0 tonnes. To lift that from 15°C to 30°C, the suspended slab needs 226.16 kWh. The screed needs 44.0 kWh.
Suspended slab: 226.16 kWh · Insulated screed: 44.0 kWh
The initial heat-up of the suspended slab alone takes more than 5 times the energy of the insulated screed. And that is before we count a single watt of the extra losses.
How much longer does it take to warm up?
A 100 m² floor in an average Perth home might have a heat source of 5 to 8 kW. Take the top of that range, 8.0 kW. The screed: 44.0 kWh ÷ 8.0 kW = 5.5 hours. The suspended slab: 226.16 kWh ÷ 8.0 kW = 28.27 hours. More than five times as long – and longer again with a smaller heat source. Switched on Tuesday before dinner; warm on Thursday.
Those are stone-cold starts, the first cold week of the season. Once a well-built system is in its winter rhythm it is a different job: an insulated screed starts giving out warmth within about 15 to 30 minutes of a call for heat, and an insulated on-ground slab within about 45 to 60. That is why we run it on a schedule, not on a whim.
You could fit a bigger heat source to speed that up, but then it spends almost all its life running at a fraction of its capacity, which wrecks its efficiency and its lifespan, and costs several times more to install. It is like buying a road-train to fetch milk from the corner shop.
Running cost: the number that actually matters
The real damage with a suspended slab is ongoing loss. Heat pours out of every exposed surface to the outside, and conducts straight into walls and steel structure it is touching. For a 100 m² heated floor with a heat pump, average-insulated building:
Insulated heated screed: as low as ~$0.46 per hour
Heated suspended slab: as high as ~$1.84 per hour
The suspended slab costs up to four times more to run. Forever. At that point it would be cheaper to throw the hydronic system away and run a basic air-conditioner.
In rough monthly terms across a Perth winter, that is the difference between something like $110 of heating a month and $440 a month – Matt's July – for the same heat, in the same house. Electricity prices move, so the exact dollars will too, but the multiple does not. Up to about 4× is physics, not a sales pitch. It will still be about 4× in twenty years.
Figures use the current Synergy Home Plan (A1) flat rate of 33.26 c/kWh (GST inc, July 2026), a heat pump at COP 3 (three units of heat for every unit of electricity – the cautious end, to stay on the safe side), and an average-insulated 100 m² home over a five-month heating season. Modelled estimates, not a quote. Want the number for your house, with your own floor area and inputs? The Running Cost Calculator does exactly that – link at the end of this guide.
So why is it done this way so often?
Because it is easier and cheaper to lay pipe in a suspended slab. Both true. And both irrelevant once you are the one paying the bill every winter for the next thirty years.
Plenty of "eco" or "enviro" plumbers will tell you "we have installed heaps of these into suspended slabs." They have. And those systems do warm the rooms above, a bit. They also warm the bricks, the walls, the room below, the garage, the pantry, the alfresco, the balcony and the open air – which is how Claire's garage became the warmest room in the house. Instead of the efficient, sustainable system you were sold, you get one that costs more to run than the aircon you were trying to replace.

What about pouring the screed straight onto the slab?
Does not work. Without thermal insulation between the screed and the slab, the two bond into one thick mass and behave as one. You are back to heating a suspended slab.
- Do not cast heating pipe into a suspended slab that has no insulation under it and at every edge, unless you want an unhappy client and a cold house.
- Put the pipes on top of the slab, inside an insulated screed or another well-insulated system (diffusion plates, or a dry system). Upstairs or over a garage, that means an insulated screed on top of the suspended slab. Where the design genuinely calls for the heat in the slab itself, the slab is insulated underneath and at every edge first. It costs a little more up front. Insulation under and around the heated layer cuts the heat lost into the ground and structure by most of it – the single biggest reason a floor built right costs a third to a half as much to run. The wasted heat will cost far more than the insulation ever did.
Mass is not the enemy – uninsulated mass is. A screed on insulation is quick enough to follow the day and heavy enough to carry some afternoon warmth into the evening. It is the thick slab with nothing under it that turns your heating into a heater for the ground.
Hiding the heat pump
Drawn from the calls we take every winter. The people are composites, not clients; the figures are our modelled estimates, not their bills.
The calls that go best are the ones that come early. An owner-builder rang us one Thursday – slab down, frame going up, brickies booked – with a question about something else entirely: he wanted to know what week to schedule the manifold connections – the manifold being the box where every pipe loop starts and ends. Near the end of the call he mentioned, in passing, that the heat pump already had a good home. He had drawn a store room off the garage for it. Out of sight, out of the weather, close to the manifold. He was pleased with it, and on paper it was tidy thinking.
I asked him one question: where does the fan breathe?
The pause went on long enough that I did not need the answer. The store room had a door, a vent brick, and nothing else.
The unit went outside instead, against the south wall, fan facing open air with nothing near it. The change cost him a morning with the drawings, because the walls were not up yet. That is the entire difference between his story and most of the others in this guide: he asked the question while the answer could still be changed.
He never found out what that store room would have done to his system. Here is what he avoided.
How a heat pump works
The warm water in your floor is made by a heat pump. It is a machine of some size, it hums a little, and the instinct is almost always to hide it. In a garage. A store room. A roof space. Somewhere out of sight, protected from the weather.
Sensible idea, until you understand how a heat pump actually works. Then you would no more box it in than you would pull a plastic bag over your head.
An air-to-water heat pump scoops low-grade energy out of the air and concentrates it into useful heat. On a 10°C winter day the air feels cold to you, but to the heat pump it is a reservoir of free heat.
The compressor squeezes refrigerant until it is hot, around 40°C. Water from your system pulls that heat away, cooling the refrigerant to about 35°C. The refrigerant is then released and turns cold, say 5°C. The fan drags it through outside air, where it picks up warmth and climbs back from 5°C to 7°C to 10°C, and the cycle repeats. Round and round, as long as the house is calling for heat.
The warmer the air it is breathing, the more efficient it is.
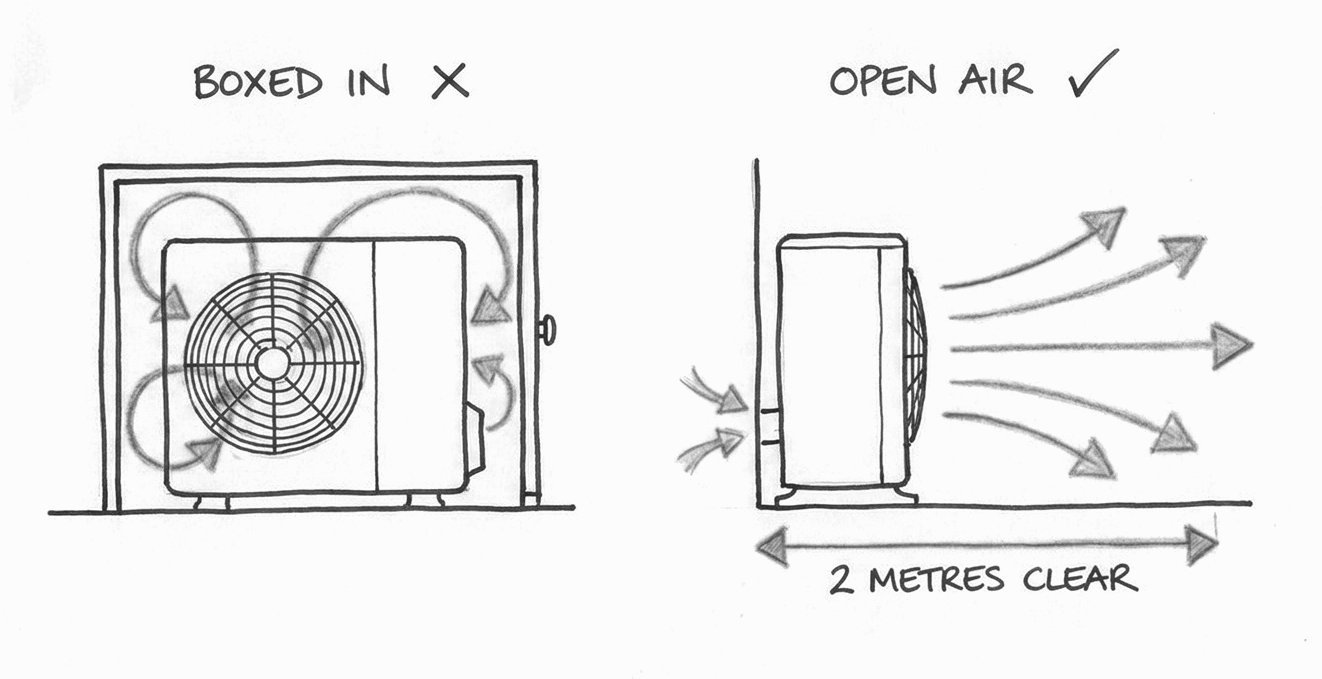
What happens when you box it in
Put that heat pump in a closed garage. It is 10°C outside but 15°C in the garage. It fires up and starts pulling heat from that nice 15°C air. Efficient.
Fifteen minutes later the garage is down to 10°C. Efficiency drops.
Another fifteen minutes, the garage is 5°C and the heat pump needs about a third more power for the same heat. Bills climbing.
Forty minutes in, the garage is 2°C, the coil is frosting up, and it is working close to twice as hard to produce anything. Then someone opens the garage door, the stale 2°C air spills out, fresh 10°C air rushes in, and efficiency jumps back up. Exactly like getting a breath of air after the bag comes off.
Does a vented room fix it?
Barely. Most of the same air just recirculates inside the enclosed space. Even a wall or fence close in front of the fan can cause enough recirculation to cut the heat pump's efficiency by up to 50%.
- Site the heat pump so the exhaust air cannot get sucked straight back in. In front of the fan, leave at least 2 metres of open air, so the chilled exhaust drifts away instead of being breathed back in. Behind and beside the unit, the maker's minimum is enough – usually a few hundred millimetres.
- Decide where it goes while you are designing the building, not after, or it ends up jammed in a dead corner with no airflow. One question at drawing stage – where does the fan breathe? – is the cheapest fix in this guide.
- If it genuinely has to be indoors, in a plant room for example, use a purpose-built internal unit that is properly ducted.
- Stop worrying about protecting it from rain, dust and sun. A good outdoor unit is built for the weather, like a car. Choking it to keep it pretty wears the compressor and fan out far faster than the weather ever would.
Putting controllers and thermostats in the wrong place
A modelled scenario – the physics and rates are real, the household is invented, and every figure is a modelled estimate, not a quote or a promise.
Walk through a July morning in 2031 with me. A modelled morning, in a house where this mistake was not made.
It is a Tuesday, 4 degrees outside at six a.m. Nothing in the house has switched on with a thud. Since well before dawn the system has been feeding heat quietly and unevenly on purpose – 30% for a stretch, easing to 17%, lifting to 19%, dropping to 5% – because the controller knows how fast each room gains and loses heat, and started each one exactly early enough. The floor is not hot. Nothing blows. The rooms are simply at the temperature somebody chose, at the hour they chose it, and a six-year-old walks to breakfast barefoot without anyone finding that remarkable.
Nobody in this house knows any of that is happening. That is the whole point. And none of it came from the thermostat on the wall. It came from a calculation made before the walls were up.
Why instant heat is not enough
We heat our homes to feel comfortable in them. A modern system lets you set the temperature you want, the thermostat reads the room, and the controller nudges the heat up or down to hold it there.
But there is a world of difference between a room warmed in blasts and a room brought up gently and deliberately.
Aircon and gas heaters heat the air – even a modern inverter unit that throttles down smoothly. The walls and floor stay cool, so you set the thermostat higher to feel warm, and the older on-off heaters simply blast until the thermostat says stop. Technically the room hit the set temperature. The people in it still are not comfortable.
Instant heat does not feel the same as gradual heat. Outside, you can feel hot and sticky one day and perfectly fine the next at the very same air temperature, because comfort is also about humidity, breeze and shade. Indoors, most of your comfort comes from the room being warmed up gradually and evenly.
That is the secret behind why a good hydronic floor feels so natural. No blasts. The room rises slowly, the way the warm morning sun is pleasant where the harsh midday sun is not.
The warm-up calculation
You cannot just fit thermostats, switch on and hope. To get real comfort we calculate how fast each space warms up and cools down – what we call its "temperature gradient" – a genuinely involved bit of maths driven by how much glass is in the room, which way it faces, what the house is built from, what is around it, and everything else that governs how fast a room gains, holds or loses heat.
Only then can we work out how early to start the system so the rooms are warm exactly when you need them. That is what actually lowers the running cost and delivers comfort at the same time – and it is where the modelled morning above comes from.
Done right, the system stops slamming fully on and fully off. You do not drive a car by flooring it and stamping the brake. Same with heating a house.
The 5 most common thermostat positioning mistakes
- It controls floor temperature only. If it watches the slab instead of the room, you get over- or under-heating. Slab temperature is not room temperature.
- It is hidden in a cupboard. It cannot read the room it is supposed to control. The cupboard runs warmer or cooler than the space, so the room is wrong.
- It is in an unheated area. It is faithfully reading a part of the house nobody is heating, so it controls nothing that matters.
- It is in sunlight, a draught, or next to a heat source. A false reading, pushed around by something other than the room.
- The sensor sits on the aircon return duct. Often not what the occupants actually feel, because the return pulls only the top layer of air, not the air down where people live.
- Fit pipes and stick a thermostat in each room and yes, the house can reach a set temperature. You still have no guarantee it will feel comfortable. Remember the two identical-temperature days that felt completely different.
- For genuine room-by-room comfort, the calculations have to be done by people who understand sun, orientation, materials and how neighbouring rooms interact.
- Keep thermostats out of direct sun, ideally around 1.5 metres above the floor, in the room they actually serve.
- Use a thermostat that reads both room air and radiant temperature, and that is time-programmable so it warms the room before you need it and does not cook it when you do not.
Forgetting that heat leaks
A real case from our files. Told as it happened; where a name is changed, we say so.
September 1992. A newly built commercial building, and a hot water ring main – the loop that gives a building instant hot water at every tap – costing a small fortune to run. We had designed the system; another company had installed it. The owner wanted to know why the bills looked the way they did.
You do not argue about bills. You measure. We put thermometers on the supply and the return and read the difference: six degrees. The water was coming back six degrees colder than it left, hour after hour, around the clock. Six degrees does not sound like much. Priced out, it was about $89 every day. $2,708 a month. $32,503 a year, leaking out of one loop of pipe – a loss that should have been almost thirty times lower. A few dollars a day, not eighty-nine.
The tradesman who had installed it was not having any of it. "That's. Not. How. We. Do it. Here." And he pointed at his work, and to be fair to him, everything you could see was immaculate: every visible pipe neatly insulated, every clip straight.
So we opened a wall. Everywhere the pipes ran where nobody would ever see them – inside walls, under floors – they were bare. The building was paying $32,503 a year to warm its own wall cavities.
"This is the way we have always done it," he said. That was probably true as well.
The insulation was ripped out and redone to specification, and the loop went back to costing a few dollars a day. The owner got the building he had paid for – at the price of a fight, a re-do, and a hole in a brand-new wall. We fought versions of that battle through the whole of the nineties. It is one reason we took about 95% of everything in-house more than twenty-five years ago: there are only so many walls you can afford to open.
That building leaked through hidden pipe. A house with floor heating leaks somewhere else – but by the same law, with the same invisibility, and the leak is just as expensive per degree.
Heat always moves from hot to cold, never the other way. The heat you make will go hunting for the coldest thing nearby and warm that first. Fine if that is your furniture, your walls and you. A disaster if it is the uninsulated garage, the roof space, the pantry or the windows.
Where most of the heat escapes
- Glazing. Heat radiates straight out through the glass, and warm inside air dumps its heat through the glass to the cold outside. Use double glazing with high R-value glass wherever you can.
- Roof. Warm air under the ceiling leaks into the roof space and away. Insulate the ceiling and roof properly with bulk or rigid insulation. Note this hurts radiant floor heating less than aircon, because with a warm floor you are not relying on hot air pooling at the ceiling in the first place.
- Thermal bridges. Any building element that connects inside directly to outside and lets energy conduct straight through. Aluminium window frames are the classic: heat walks from inside to outside through a great conductor in a path under 100 mm long.
What you must understand about thermal bridges with floor heating
With ordinary aircon, only the room air gets heated, not the structure. The warmest air sits at the ceiling and bleeds energy into the roof. The coldest layer sits at the floor. That cool floor layer hands only a little heat to the slab, because cool air is a poor carrier, so losses into the slab stay low.
Floor heating turns that upside down. Now the floor itself is the warmest surface, hotter than the room air, and it gives off roughly 55% of its energy as radiant heat, about 30% by air convection and about 15% by conduction into structure and furniture.
But that only holds for an insulated screed (or a genuinely well-insulated slab). In a heated structural slab where the thermal bridges and losses were ignored, the split can collapse to as little as 25% radiant, 5% convection and 70% conduction into surrounding structure or the ground. With a direct path from the warm slab to the cold outside, most of your heat is dragged straight outdoors. Up to 70% of the energy you put into the slab can be lost without ever warming the room. The 1992 building at least got a measurement and a re-do. A slab gets neither – nobody opens a wall, because there is no wall to open.
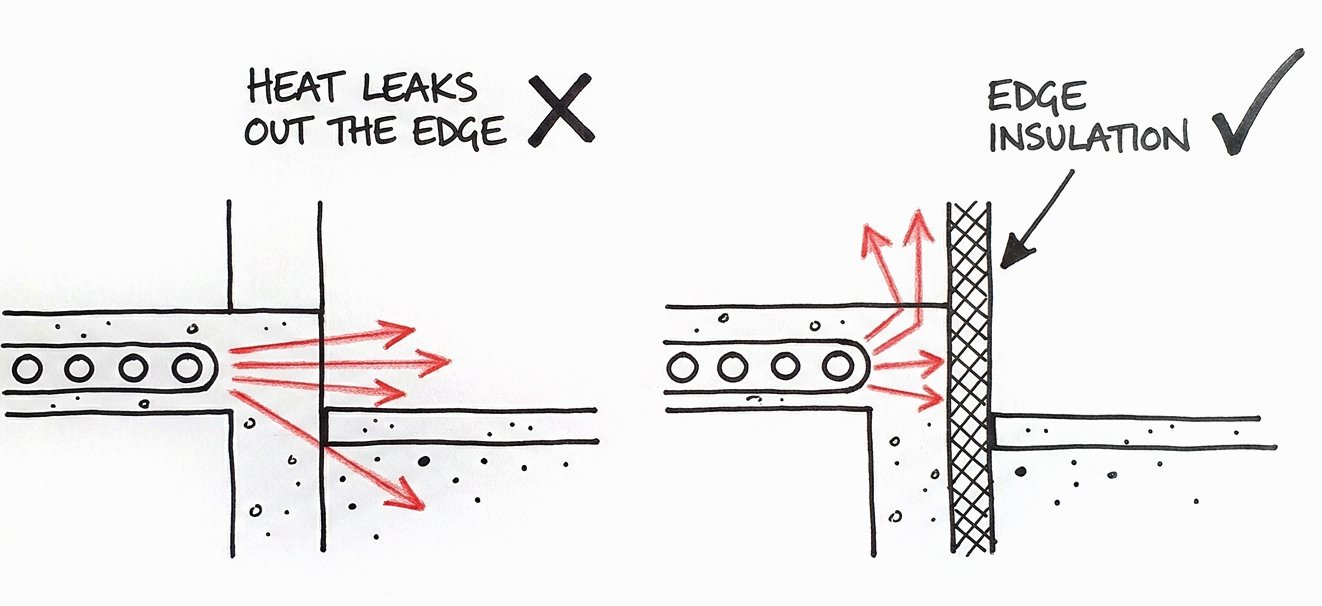
Common thermal-bridge traps
Heated slab edge exposed to sand or soil. People love to say "WA sand insulates." It does not. Dry sand conducts heat about 10 times better than polystyrene, twice as well as plywood, and about a quarter as well as concrete. Add moisture from a downpipe, an overflowing soak-well, high groundwater or a leak, and its conductivity climbs to match concrete.
Heated slab edge touching another concrete structure. The worst case. Heat flows away so hard the floor heating is effectively useless. Usual culprits: pools, in-situ concrete paving, cast-in planters and other external concrete butting straight onto the heated slab.
- Use thermal breaks to stop drastic losses. This is not optional on a system you want to perform.
- Insulate under an on-ground slab. The NCC does not require it in most WA climate zones, but we strongly recommend it. Here, 25 to 50 mm of polystyrene or similar rigid insulation does the job.
- Insulate the slab edge. For a heated slab-on-ground, the NCC 2022 Housing Provisions (clause 13.2.6, in force in WA since 1 May 2025) require at least R1.0 insulation down the full depth of the slab's vertical edge. 30 mm of XPS or 25 mm of phenolic foam is enough.
- Remember suspended slabs leak worst of all (Mistake #1). Under the NCC they need underside or soffit insulation on top of edge insulation.
- The cleanest result comes from an insulated screed, because it designs out the leaks that careless detailing creates. A screed poured straight onto a slab with no thermal break is a corner cut that ends badly: the slab below quietly drinks the heat out of the screed. A properly built screed system is thermally isolated from walls, window frames and any slab beneath it.
Assuming all hydronic systems are equal
Drawn from the calls we take every winter. The people are composites, not clients; the figures are our modelled estimates, not their bills.
A kitchen table in Perth, a weeknight, two quotes side by side. She has read both twice. He is holding them stacked, one in each hand, as if the weight might settle it. Both pages say pipe, a heat pump, one manifold, a price. Both say "hydronic is 30% more efficient than air conditioning." The prices are not close.
"They're the same pipes," he said, holding both quotes.
He was right. That was the problem.
She went through the dearer quote line by line, looking for the thing that explained the difference. It was not there. There is no line item on either page that says which of these systems was calculated and which was guessed – the difference is real, but it is not printed anywhere a homeowner can see it.
They sat with it for a while. Then he said what nearly everyone at that table eventually says: "Surely they're all much the same."
This chapter is for that sentence. Because the couple at that table have not decided yet – and what they decide will depend on whether anyone ever shows them what follows.
The claims, and what they leave out
Search "hydronic heating" online and you will hit the same two lines everywhere: "hydronic is 30% more efficient than aircon" and "water carries heat better than air." The trouble is not that those lines are false. They can be true. The trouble is everyone assumes they apply to every system in every building, automatically. They do not.
We will be the first to tell you hydronic is the right answer only sometimes: only when the system is designed and built with knowledge, real calculations and care. An efficient principle does not give you an efficient system, or an efficient building, by default.
The 12 mistakes that quietly destroy efficiency
- Pipes buried in too much concrete mass – expensive to heat, slow to respond.
- Thermal bridges from heated slab to unheated or external elements – heat escapes, doubling or tripling running cost and dragging out heat-up time.
- Uninsulated pipe between the heat source and the manifold – heat lost before it even arrives.
- Water flow rate too low – not enough energy delivered, leaving cold spots.
- Heat source oversized – runs at low efficiency and dies young.
- Pipe spacing too wide – the floor simply cannot put out the heat required.
- Thermostat in the wrong place or used for the wrong job – over- or under-heating (see Mistake #3).
- Heat source poorly positioned – low efficiency and early failure (see Mistake #2).
- Badly designed loops – cold spots, weak heating where it is needed most (tall windows, high ceilings), overheating where the sun already does the work.
- Building heat losses never properly calculated.
- Loop design ignoring floor finish or furniture layout.
- Sloppy installation – kinked pipes, uneven spacing, pipe breaking the surface of the slab.
These happen constantly. It is genuinely easy to get wrong. And almost always impossible to fix afterward. Not one of them would appear on either quote on that kitchen table.
Why hydronic is different from everything else
A great result, efficient and comfortable, comes from pairing a well-designed, well-built hydronic system with a well-designed, well-built building. The system is woven into the building itself. The two have to work in harmony, not against each other.
A brilliant system in a poorly built structure disappoints. So does a poor system in a brilliant structure. You need both.
Does water really beat air?
Yes. To move 2.5 kW of heat with air you might shift 200 litres of air every second. To move the same 2.5 kW with water you need about 0.06 litres a second. Far less mechanical effort, and a small water pipe (say 20 mm) loses far less than a big air duct (say 300 mm).
At 20°C and 100 kPa: a cubic metre of air holds about 0.000336 kWh per degree; a cubic metre of water holds about 1.159 kWh per degree. Water carries roughly 3,450 times more energy than air for the same volume.
Is hydronic really 30% more efficient than aircon?
It can be more efficient, but 30% is the optimistic end. The 30% usually refers to being able to set the thermostat about 2°C lower with radiant heat while feeling just as comfortable, and to the HVAC rule of thumb that every 1°C lower you set saves up to 15% in running cost – in Perth's mild winters, where the gap between inside and outside is small. In our experience of Australian houses, built the way they are built here, the real advantage is more like 15%, and only when the system is done right.
But compare fairly:
- Refrigerated aircon (heating mode) vs in-screed hydronic with a heat pump: a fair fight. The aircon condenser works just like a hydronic heat pump; the difference is how the energy is distributed and how much is wasted. Here, a floor built right runs in the same league as a good reverse-cycle system, and can come in a little under it – that 15% or so – because you are comfortable at a lower air temperature.
- In-suspended-slab hydronic vs aircon: apples to oranges. The suspended slab leaks so badly it costs several times more to run than the aircon (Mistake #1).
- In-screed hydronic with a gas boiler vs aircon: also not a fair fight, and not in hydronic's favour. A heat-pump aircon at about 300% efficiency produces heat for around $0.11 per kWh of heat at the current 33.26 c/kWh electricity rate. A condensing gas boiler at about 95% produces heat for around $0.19 per kWh of heat at roughly 18 c/kWh for natural gas (Kleenheat WA residential). Even after applying the 15% or so comfort advantage, the gas-fired hydronic lands near $0.16 per kWh, so the aircon comes out close to a third cheaper to run.
So be very careful with "facts" about hydronic heating. In our experience across WA since 1992, about 95% of installers do not really understand these systems. Not because they are dishonest, but because hydronic is much more than plumbing. It takes real engineering to get right. In Europe, hydronic systems are designed by heating engineers, not laid by whoever is cheapest, because it takes several disciplines working together to make one succeed.
What getting it wrong actually costs you
Read back over those five mistakes and notice what they have in common. Every one is invisible at the point you decide. Most are set in concrete, literally, the day the slab is poured, and the rest are locked in once the walls go up. And almost none of them can be fixed afterward without demolishing the house.
So picture what really happens when a system is built wrong. You do not call in a crew to rip up the slab, pull down the walls and start again. Nobody does that. The system that cost you tens of thousands of dollars sits there underperforming until, one cold week, you give up and switch it off. Then you go back to running the aircon or the gas heater you were trying to leave behind, and you pay to run that on top of the heating asset you have just abandoned.
That is the true cost of these mistakes. Not a repair bill. A five-figure asset written off to zero, plus the running cost of whatever you fall back on, plus years of telling everyone you know that hydronic heating is a waste of money. When the truth is that hydronic heating is excellent, and what failed you was the engineering nobody did.
Both point to the same conclusion: there is no second attempt at this. It has to be right the first time.
Two winters, one house
Take your build – the one on your drawings now – and run its first few winters twice. Both versions below are modelled, same house, same weather, same family. The only thing that changes is which quote got signed.
In the first version you signed the cheaper quote. Nothing dramatic happens; that is the trap of it. The system goes in on time, passes its pressure test, warms the floor a little. On a 200-square-metre home, the model says this version costs about $601 a month to run through a Perth winter. By the second or third July you are choosing between being warm and being sensible, and one evening the switch settles it. You know the rest of this story – you read it in Mistake #1.
In the second version, the same house signed the quote with the engineering behind it. Same winter, same rooms, same 4-degree nights. The model says about $240 a month. Nobody in the house thinks about the system again. Run the two versions out over twenty years and the gap between them is about $36,100 – for the same warmth, in the same house, decided once, before the pour, by somebody choosing between quotes that looked almost identical.
All of those figures are modelled estimates, not quotes or promises: a 200 m² home, per month across a five-month Perth heating season (May–September), at today's Synergy A1 rate (33.26 c/kWh, July 2026). The 20-year gap is over 20 winters with the tariff held flat. Your house has its own number – and the calculator below will give it to you.
See the gap for your own house, before the slab is poured.
Run your numbers →How to make sure yours actually works
Anyone can lay pipe, screw in a thermostat and switch on a heat pump. Only a handful of people have the engineering, the training and the experience to make the system as efficient and comfortable as you were promised.
That gap is exactly what we built our method to close. We call it The 37-Point Design: 37 checks and calculations, run on every system before a single pipe goes in, covering the heat losses, the slab and insulation, the heat-pump siting, the loop design, the flow rates, the controls and the warm-up time for every room. A standard installation covers the physical steps – not the engineering that makes those steps count. That is the difference you cannot see in a quote, and the difference you feel every winter for thirty years. It is the same method behind every one of the 23,957+ m² of hydronic floor we have designed and built in WA since 1992.

We do not just lay floor heating. We work out how to cut the building's energy demand in the first place, then design every millimetre of the system, build it, and keep optimising it. Floor heating and cooling, natural ventilation, aircon, pool heating, cellar cooling, hot water, all integrated so the house simply stays comfortable without anyone touching anything.

The best compliment we get is no compliment at all. Our clients stop noticing the system exists. The house is just warm in winter and cool in summer, no blasts, no vents blowing at them, no spikes. They forget there is anything doing it. That is the point.
One page to keep. Print it, and ask these before you sign anything.
Five questions that sort the engineers from the guessers
Will my pipes go into an insulated screed on top of the slab – not cast into a suspended slab with nothing under it, and not a screed poured straight onto the slab?
The same system runs at up to four times the cost in a suspended slab, forever. If the answer is “we've done heaps into suspended slabs,” that is a warning, not a reassurance.
Where will the heat pump sit – and is there at least 2 metres of clear air in front of the fan?
Boxed into a garage, store room or tight corner, it re-breathes its own chilled exhaust and loses up to 50% of its efficiency. The location is a design decision, made before the walls go up.
Has each room's warm-up time been calculated, and where does each thermostat go?
A thermostat in a cupboard, in sunlight, or reading only the slab controls nothing that matters. Real comfort is calculated per room, not set by a thermostat on the nearest wall.
Where are the thermal breaks and slab-edge insulation on my plans?
A single bad thermal bridge can double or triple your running cost on its own. A heated slab needs at least R1.0 insulation down the full depth of its edge – an NCC 2022 requirement – so ask to see it drawn.
Can I see the room-by-room heat-load calculation and the loop design for my house, in writing?
An efficient principle does not give you an efficient system by default. If no calculation exists, the system was guessed – and in our experience about 95% of installers do not really understand these systems.
Your next step takes two minutes.
Before you talk to anyone, see your own numbers. Our free Running Cost Calculator takes a few details about your home and shows you the gap that decides everything: what a properly engineered system would cost you to run, against what the common cheap install would cost you, in your house, at today's electricity rate.
It is the one number a standard quote cannot give you, because it is not a plumbing number. It is an engineering one.
Run your numbers →When you want a real price for your own house, the next step is the 5-minute quote – free, and you don't need plans to start: Start my 5-minute quote → But start with the calculator. Let the number do the talking.
Already living in the home? In a finished home, floor heating means lifting the floors and laying a new screed, so for most lived-in homes the practical route is European radiators – the same quiet, fan-free hydronic warmth, from the walls instead of the floor. An extension on a new slab takes floor heating like a new build. Take our 2-minute quiz to find out which route fits your home.